GPS Simulator for OpenTX – English version
The weather is not always good for testing things outside.
To be able to continue testing with the GPS widget, I made a GPS simulator / sensor based on a previous project.
I once developed a GPS Simulator app for android, this app can generate GPS NMEA senteces like a real GPS does.
It is possible to connect to the app via an HC-06 Bluetooth module.
The Bluetooth module then sends the same NMEA messages via the UART.
Such as position, speed, height, bearing and satellite fix.
What do you need:
Arduino Nano or any AtMega328 based arduino will do
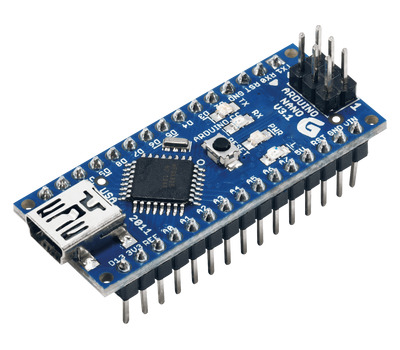
Arduino Nano
HC-06 Bluetooth module.
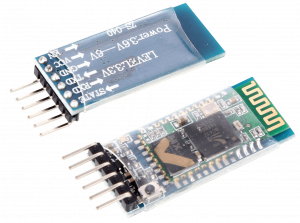
HC-06 Bluetooth Module
USB-TTL converter PCB
This is needed to program the bluetooth module and / or the Arduino Pro Mini, this can be any kind of USB to TTL adapter.
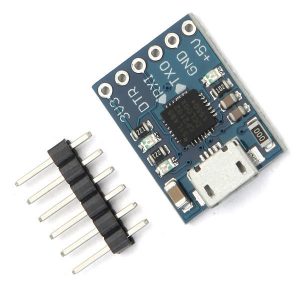
Example of USB – TTL Converter
Servo cable for Smartport connection to the receiver.
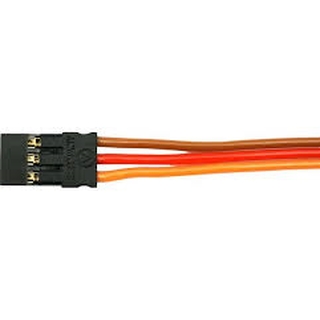
Servo Cable
Programming the Bluetooth module:
It is important to program the bluetooth module so that it works at 9600bd.
This is possible via a terminal program.
Fortunately, the HC-06 modules are already set to 9600bd by default, so you don’t have to do much here.
If you still want to change the name of the module, you will still have to program it via the USB-TTL PCB.
A good terminal program for programming is:
Terminal of Br@y: https://sites.google.com/site/terminalbpp/
Download: https://sites.google.com/site/terminalbpp/t/Terminal20130116.zip?attredirects=0&d=1
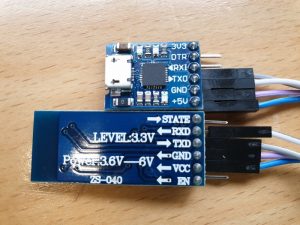
Connect the HC-06 module to the USB-TTL adapter as above in the picture.
| HC-06 | USB TTL |
| VCC | VCC |
| GND | GND |
| RX | TX |
| TX | RX |
Now start the Terminal program on the PC.
Select the correct assigned serial port (COM PORT) of the USB-TTL adapter (in this case COM6 ).
Set the baud rate to 9600bd.
Then click on “Connect / (Disconnect)”
Then enter the command “ AT ” to be sent in the white field at the bottom of the screen.
Then click on the ” Send ” button.
If the baud rate is set correctly, the answer ” OK ” should appear in the ” Receive ” window.
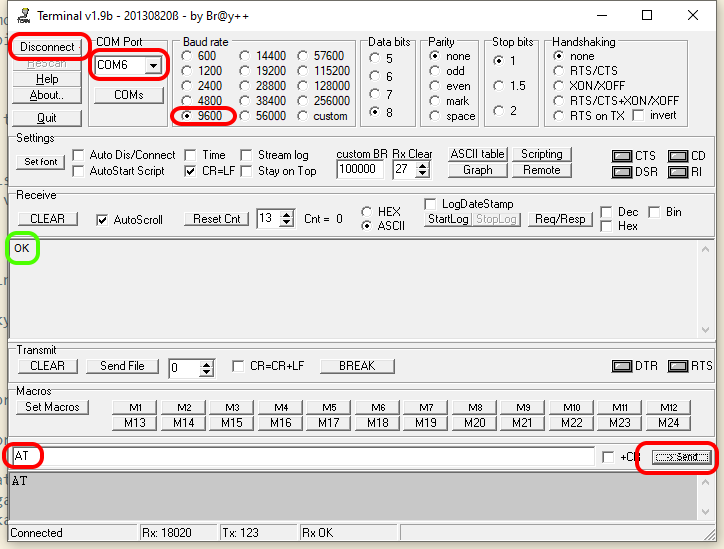
If the above does not work immediately, the HC-06 module will be in a different baud rate.
To sort this out, you will have to select a different baud rate step by step, and execute the above “ AT ” command.
Continue until the answer ” OK ” appears.
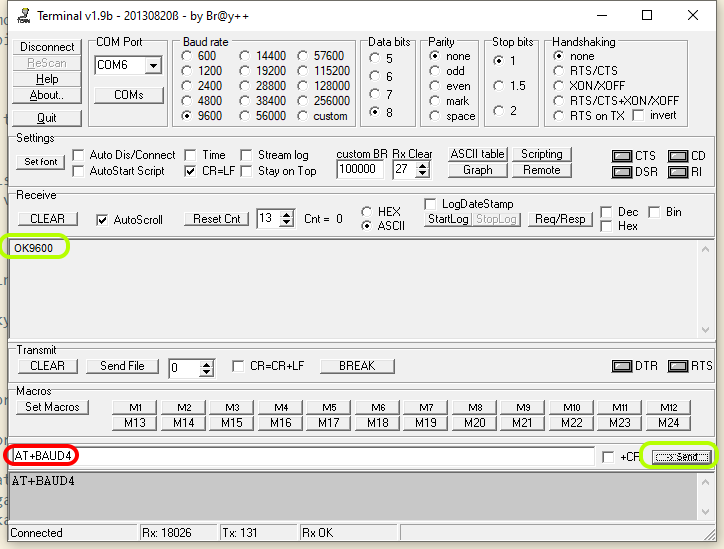
Once the answer has been received, it is now possible to set the required baud rate.
Enter the command ” AT + BAUD4 ” in the lower white field, and then press ” Send “.
The answer to this is ” OK9600 ” in the ” Receive ” window.
This means that the module is now active at 9600 baud.
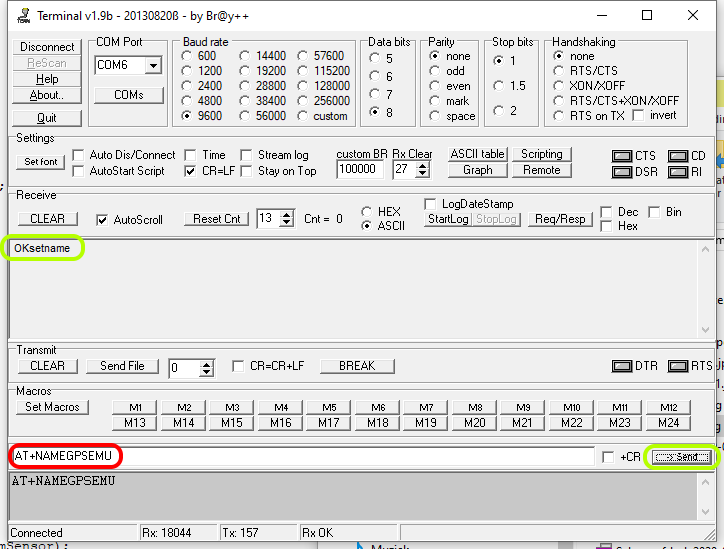
There is also a possibility to change the name of the HC-06 module.
This is the name that is displayed on a client device when searching for Bluetooth devices.
This can be done by entering the command ” AT+NAME “, immediately followed by a new name.
In this case we use the name ” GPSEMU “.
Enter the command ” AT+NAMEGPSEMU ” in the bottom white field and then click on ” Send “
The following must be returned as an answer in the ” Receive ” window: ” OKsetname “
Programming the Arduino.
In this example I will use an Arduino Nano.
Download Arduino: Arduino IDE
Use the following Sketch file: FrskyGps.zip
Install Arduino, and then unpack FrskyGps.zip.
Start Arduino and open the project called: FrskyGps.ino
The first thing to do now is to install a library for the project.
At the top of the menu, click on ” Sketch -> Include Library -> Add .ZIP Library … “
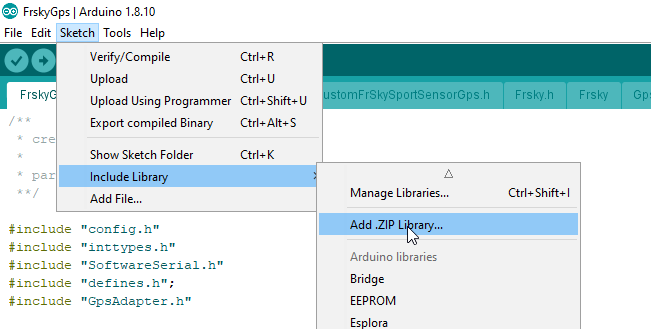
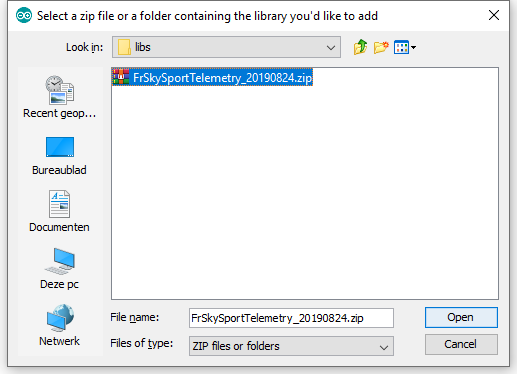
Then find the project folder, and open the “ libs ” folder.
Select the following zip file: ” FrSkySportTelemetry_20190824.zip ” and click on ” Open “
Arduino will now install the library.
Then connect the Arduino to the PC via USB.
In this case an Arduino Nano.
Now click in the top of the menu on: “ Tools ”
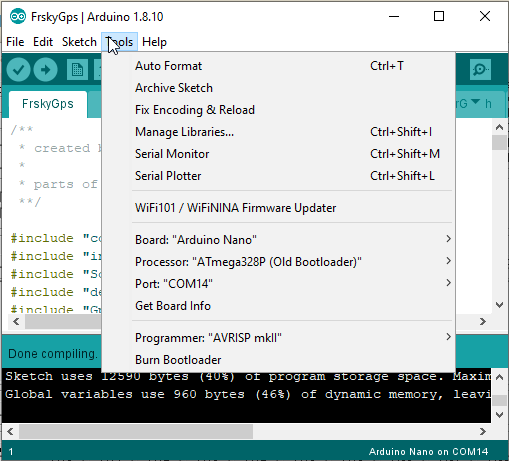
Set the following correctly
Board : “Arduino Nano”
Processor : “ATmega328P”
Here you may have to choose between “ATmega328P” and “ATmega328P (Old Bootloader)”.
You will just have to try which of the 2 you need.
In my case I have to use ” ATmega328P (Old Bootloader) “.
Port : “COM14” (in my case)
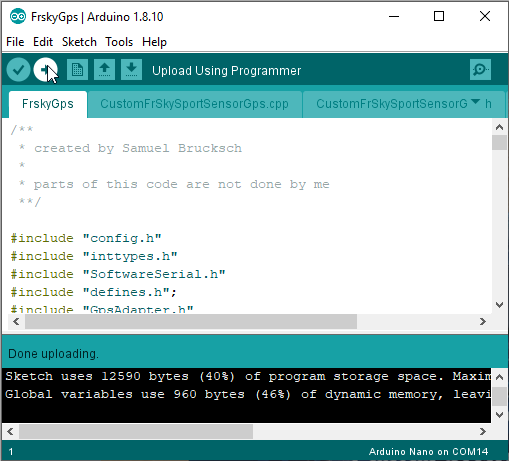
If everything is set up correctly we can flash the sketch in the arduino:
Click on the ” Upload ” icon to flash the sketch.
When the flashing is done, it says ” Done uploading ” at the bottom
Assemble hardware:
When the Arduino and the HC-06 module are programmed, it is time to assemble all the hardware.
First prepare the arduino by connecting the servo cable.
1. The red wire from the servo cable goes to VCC on the Arduino.
2. Black wire from the servo cable goes to 1 of the GND points on the Arduino.
3. Orange / white wire from the servo cable goes to Pin D3 on the Arduino.
Connecting the HC-06 module.
1. Solder a wire between the VCC of the HC-06 module to the VCC of the Arduino.
2. Solder a wire between the GND of the HC-06 module to the 1 of the GND points on the Arduino.
3. Solder a wire between RX of the HC-06 module to the TX1 pin of the Arduino.
| Arduino | HC-06 |
| VCC | VCC |
| GND | GND |
| TX1 | RX |
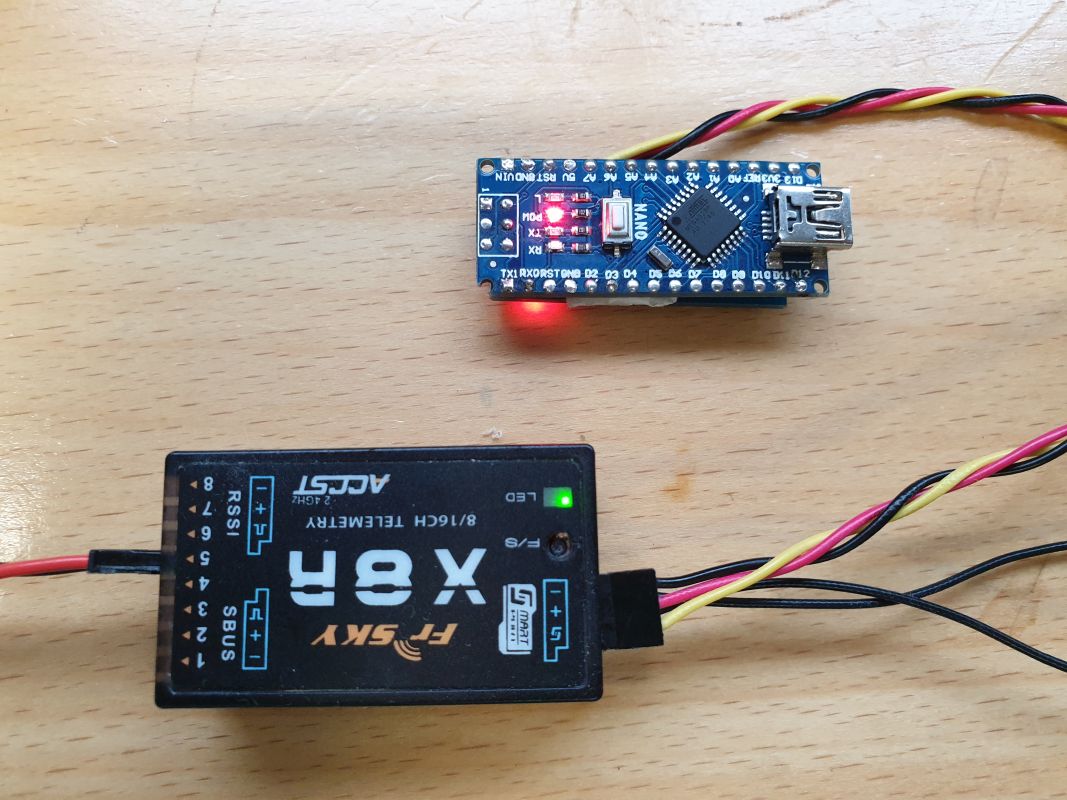
The soldering work is now done.
Now connect the Arduino via the servo cable to a receiver that is suitable for SmartPort.
To use the simulator we need an app for android.
Download : GPS NMEA Simulator
Then install the app on your android device.
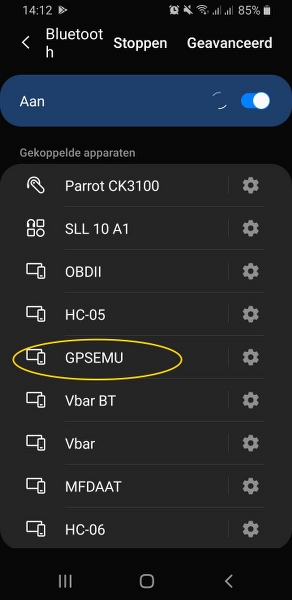
The first thing to do now is to pair the HC-06 module on the android device.
Go in your device to the settings for bluetooth and scan for bluetooth devices.
Then find the device with ” GPSEMU ” and connect.
The default password of the HC-06 module is ” 1234 “
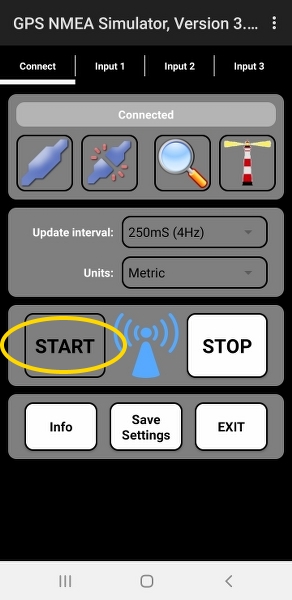
Then launch the ” GPS Nmea Simulator ” app
Click on the connect button and select Bluetooth device “ GPSEMU ”
Once connected, the bottom of the window will show “ Connected succesfully! ” stand.
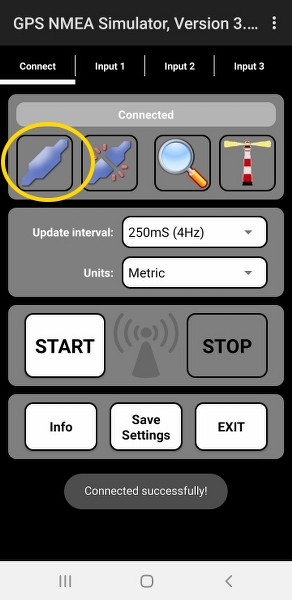

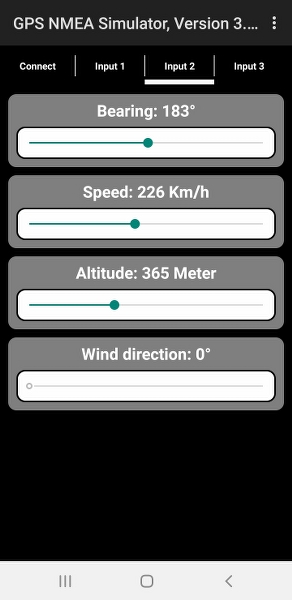
Now set some parameters to get you started.
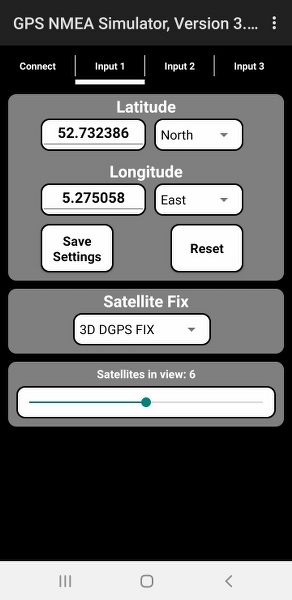
Now go back to the start screen and click on “ START ”, the symbol in the middle of the screen will now flash blue, streaming of NMEA messages has now started.
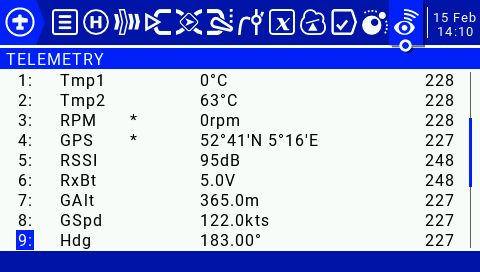
Now go to the Telemetry menu in your channel.
And click on ” Discover new sensors “
Various sensors will now be found.
Tmp1, Tmp2, GPS, GAlt, GSpd, Hdg
What would my drone “think” of this simulated signal ? Would it be able to navigate indoors ?
im looking for a solution for something similar to this GPS Simulator for OpenTX , were i can set a long and lat on something like nmea generator output the file and load onto the nano via an sd card adapeter . Then plug into any rpi or computer and have it act like a gps usb dongle like a VK-162 does ( gpsd ) ..